Portal Login Filler · User guide
How to use Portal Login Filler
Last updated
Set-up takes about five minutes. Follow the steps in order the first time. After that, daily use is Step 5 only.
Step 1
Install and open the extension
- Open Portal Login Filler in the Chrome Web Store and click Add to Chrome, then Add extension.
- Click the puzzle-piece icon in Chrome’s toolbar and the pin next to Portal Login Filler, so the gold key icon is always visible.
- Settings open by themselves at PIN lock: choose a PIN so nobody else can use the extension when you are away (Step 9), or click Skip for now.
- Click the key icon. The side panel opens on the right of the browser. The first time, it asks Set up a PIN? if you haven’t chosen one: set it, or click Not now.
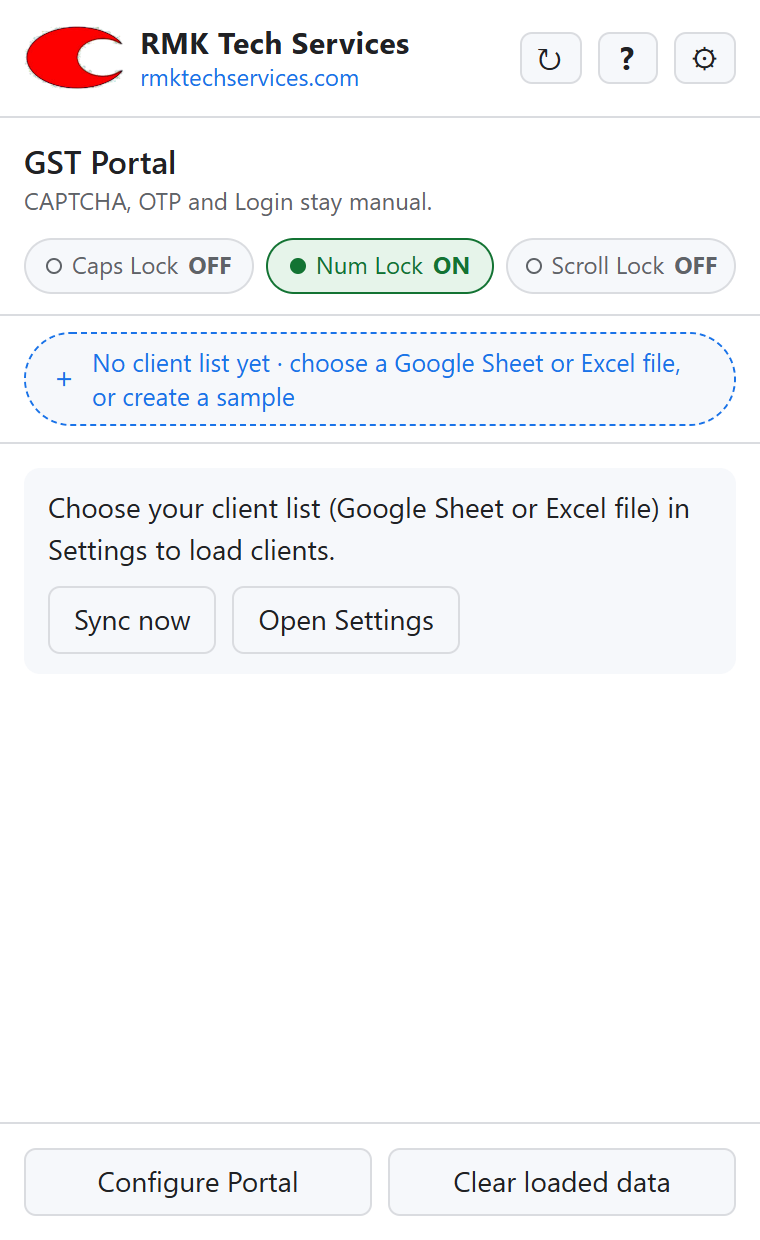
- Click ⚙ in the panel. Settings slide in right inside the panel, next to the page you are on. Each part (Licence, PIN lock, Client list, Portals, Sync, Help) opens and closes with its arrow, and shows its status on the bar. Open in tab ↗ shows the same Settings in a full tab.
Step 2
Prepare your client list
Your clients live in a spreadsheet you control: a Google Sheet or an Excel (.xlsx) file. The quickest start is a sample made by the extension (Steps 3 and 4): it has the right columns, a Portal drop-down of every portal and a few fake rows to replace. One row per login:
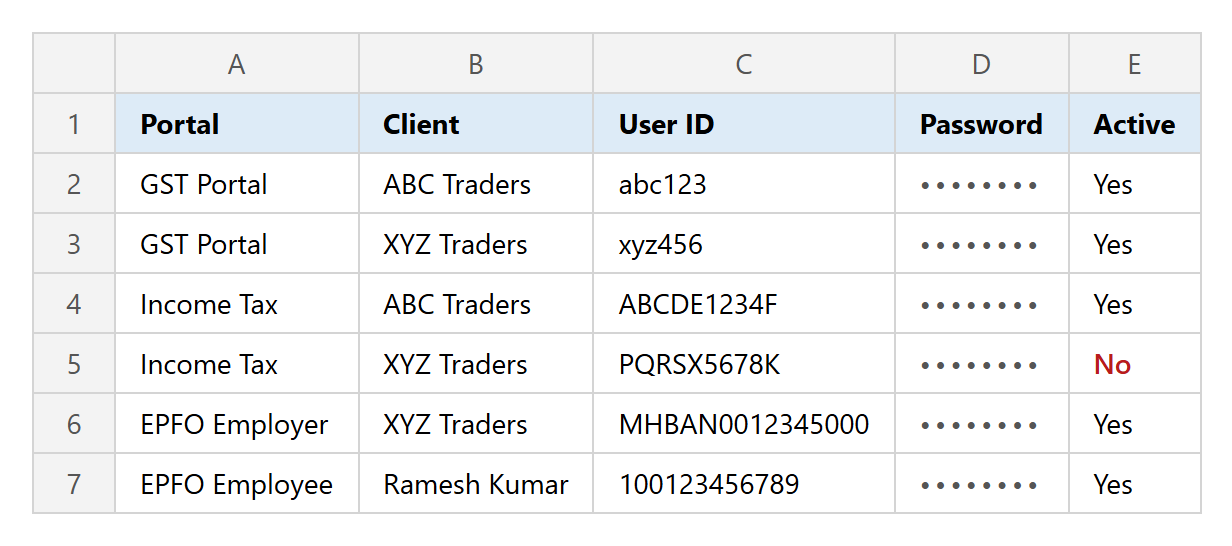
- Portal: which login the row is for. In a sample, pick it from the drop-down. All 41 ready-made portals are listed, by group:
Tax and compliance
GST Portal · E-Invoice (IRP) · E-Way Bill · Income Tax e-Filing · TRACES (TDS) · EPFO Employer · EPFO Employee (Member) · EPF Passbook · ESIC · MCA21 · ICEGATE · DGFT · Shram Suvidha · GeM · Passport Seva
Banks
SBI (personal and corporate) · HDFC Bank · ICICI Bank (retail and corporate) · Axis Bank · Kotak Mahindra Bank · Bank of Baroda · Punjab National Bank · Canara Bank · Union Bank of India · Bank of India · Indian Bank · Central Bank of India · Yes Bank, IndusInd, IDFC First, Federal, IDBI
Investments, insurance, professional, travel and pilgrimage
NSDL IDeAS · CDSL Easiest · Zerodha Kite · LIC Customer Portal · ICAI SSP · IRCTC · TTD (Tirumala Tirupati Devasthanams)
Your own
Any other login page
Common short forms work too (GST, ITR, UAN, EWB, SBI, TTD…), and capital letters and spaces doesn’t matter. A plain “EPFO” is not enough: employer and employee logins are different, so say which.
- Client: the name shown in the list. User ID and Password: the login (for TTD, the registered mobile number is the User ID).
- Active: Yes shows the row; anything else (e.g. No) hides it. Leave the column out and every row is shown.
- Columns can be in any order. Extra columns are allowed: one such as Mobile or Email can fill an extra box on a portal’s login page (Step 6); others (e.g. Notes) are ignored.
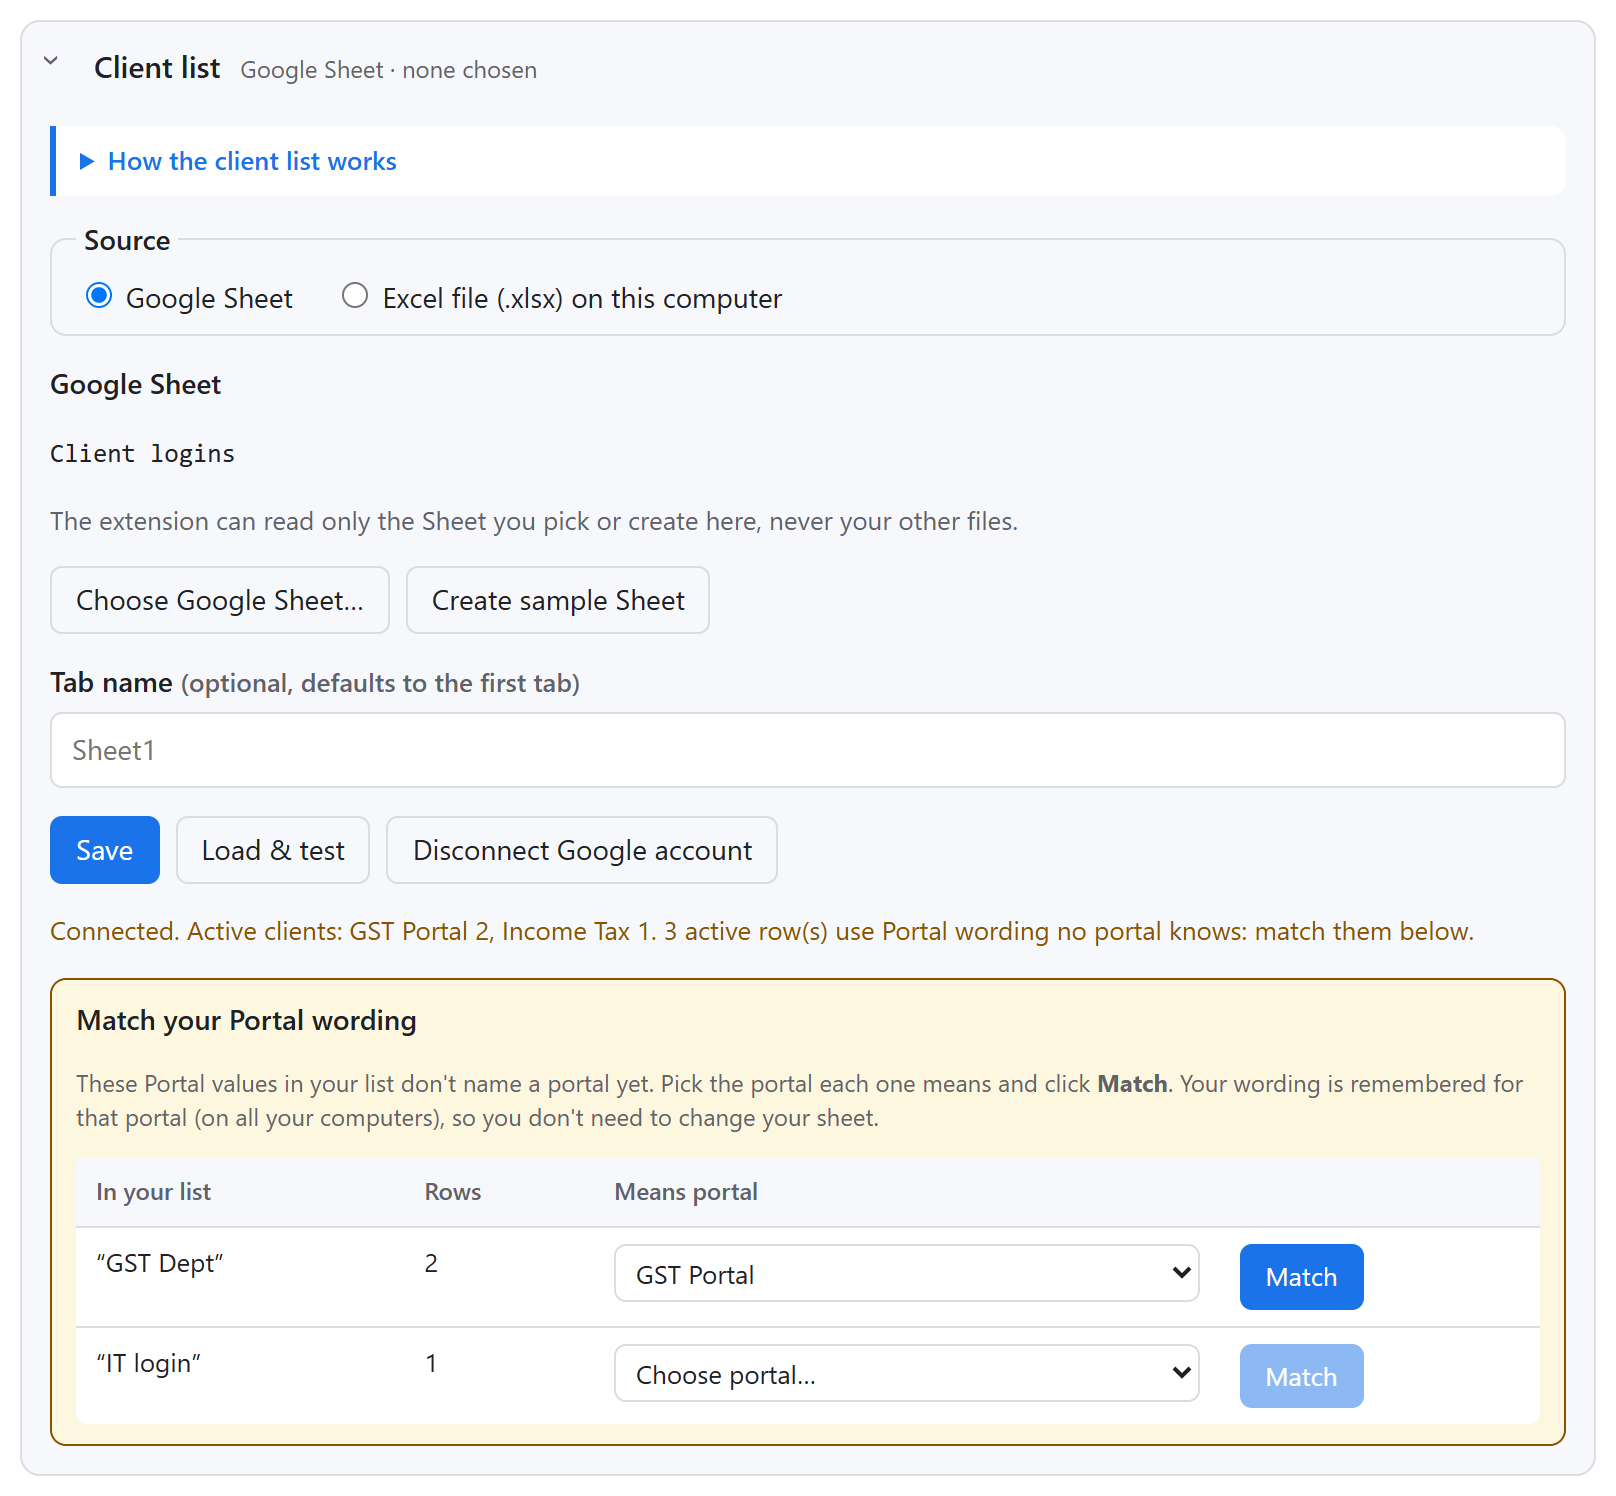
Already have your own list with your own names (“GST Dept”, “IT login”…)? Keep it. Choose it in Step 3 or 4 and click Load & test: every name the extension doesn’t know is listed with a drop-down, usually with the right portal already suggested. Click Match on each. Your wording is remembered for that portal on all your computers, and you never need to edit your sheet.
Step 3
Option A: use an Excel file
Best for one computer, or files kept in OneDrive or Google Drive for desktop.
- In Settings → Client list → Source, choose Excel file (.xlsx) on this computer.

- New list? Click Download sample .xlsx, fill in your clients (the Portal column is a drop-down; the Portals tab lists every portal), and save it in a safe folder.
- Click Choose .xlsx file…, select your file and click Open. The extension reads it straight away and shows the active clients per portal.
- If the clients are on another tab of the workbook, type its name in Tab name and click Load & test.
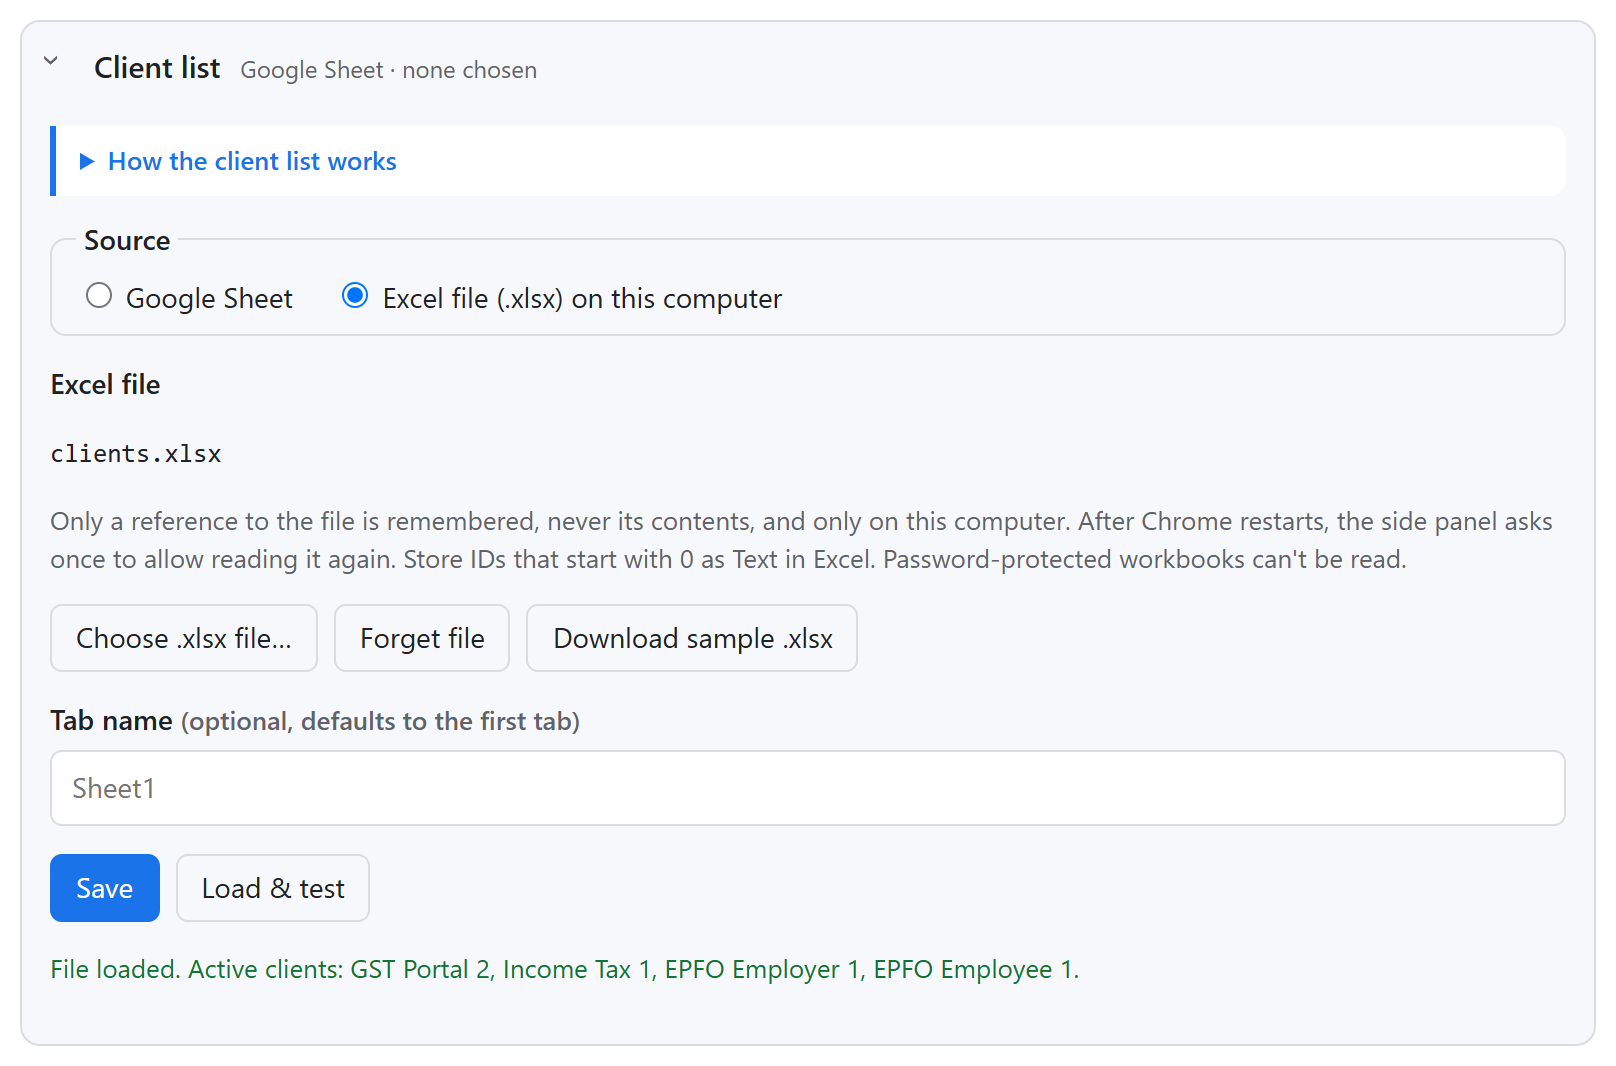
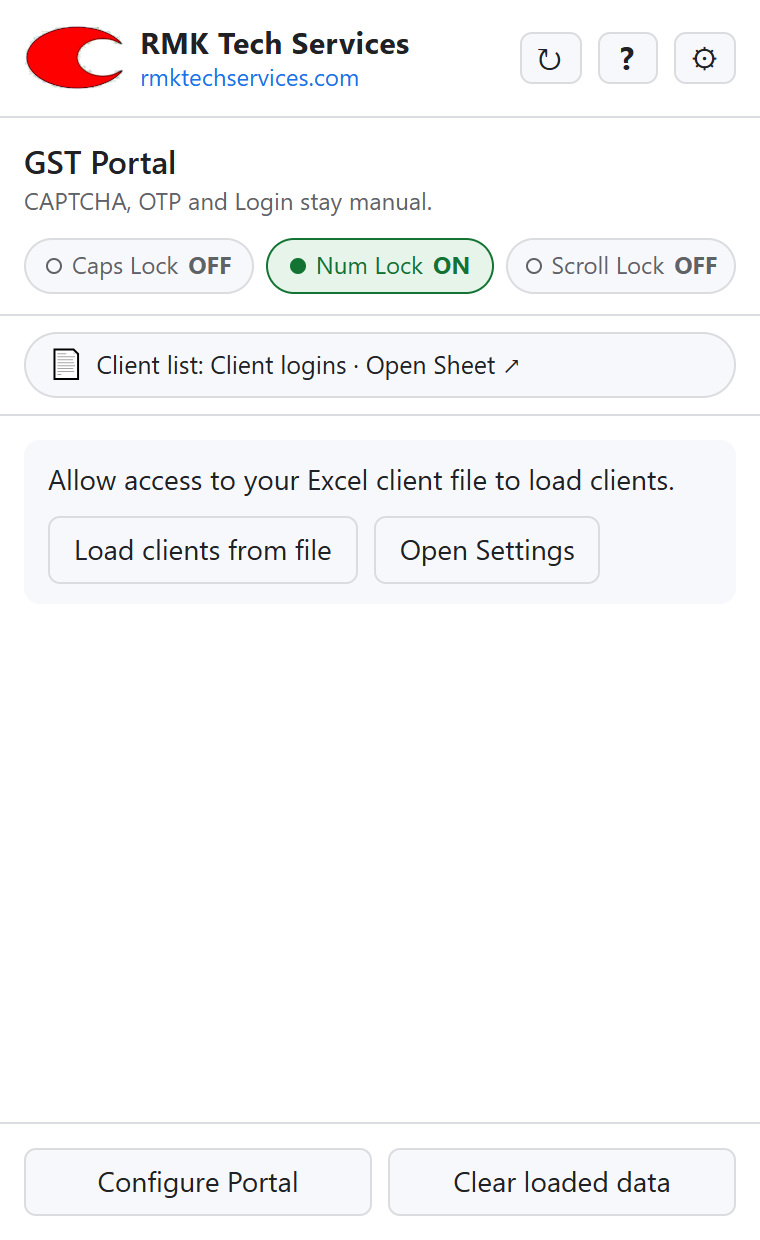
After restarting Chrome, the panel asks once for permission to read the file again. Click Load clients from file and allow it. If no prompt appears, open Settings and click Load & test.
Edited the file? Save it in Excel, then click ↻ at the top of the panel.
Step 4
Option B: use a Google Sheet
Best when you work from several computers: the same Sheet loads everywhere you sign in.
- In Settings, choose Google Sheet as the source.
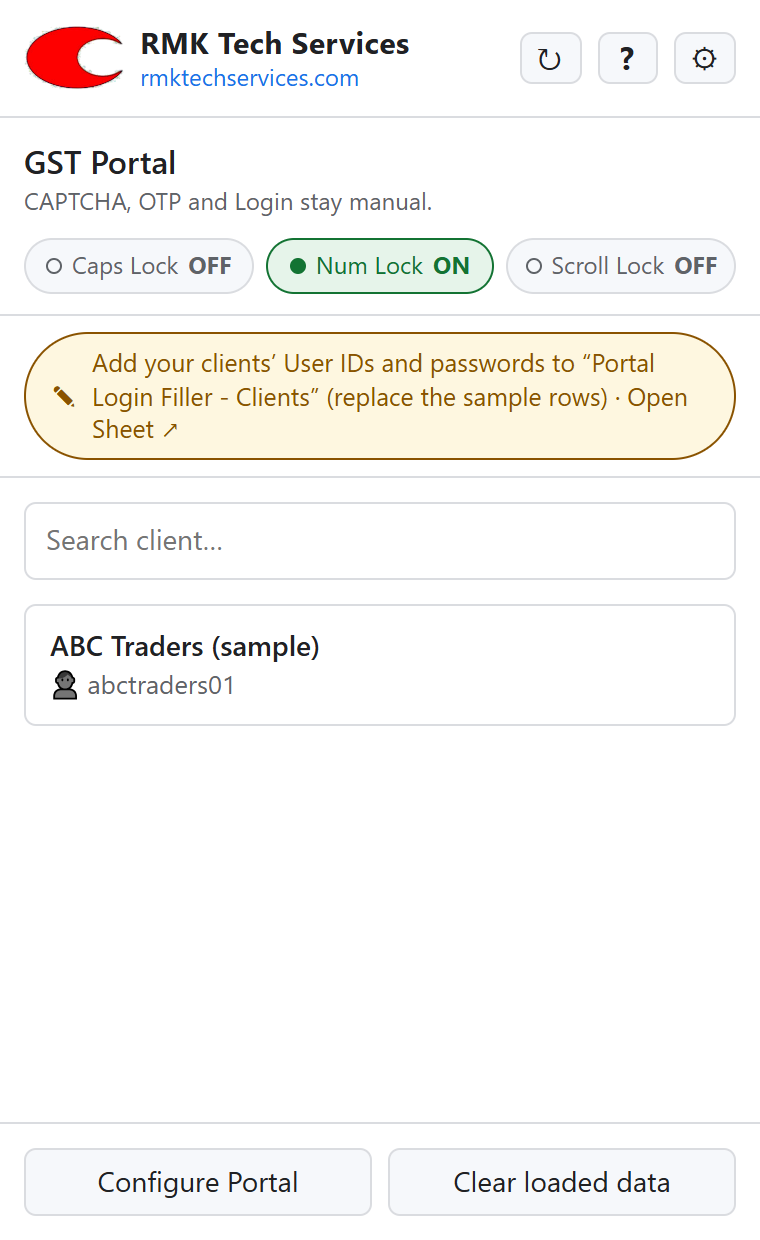
- New list: click Create sample Sheet and allow Google access. A Sheet called Portal Login Filler - Clients is made in your Google Drive, chosen for you and opened in a new tab. Replace the sample rows with your clients.
- Existing Sheet: click Choose Google Sheet…, pick the Google account that owns (or can open) it, then click your Sheet and Select in Google’s file picker. The tab closes and Settings loads the Sheet. (An Excel file can be uploaded to Google Drive and opened with File → Save as Google Sheets first.)
- The green message confirms the connection and shows active clients per portal.
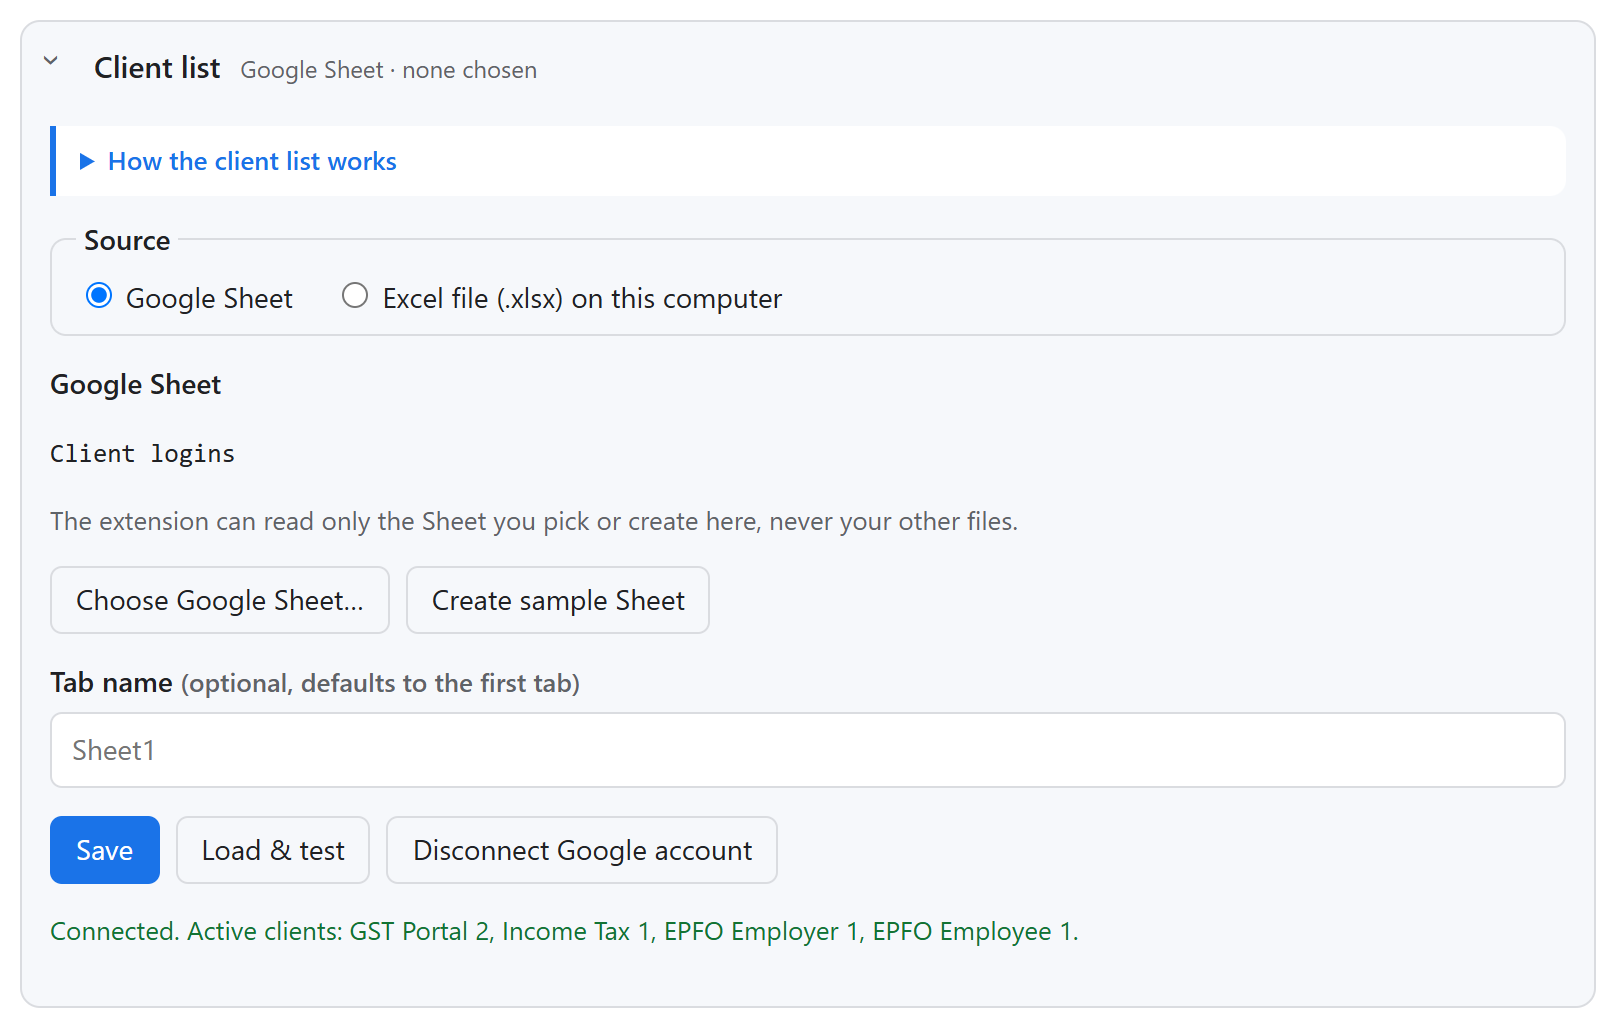
The extension can read only the Sheet you pick or create, never your other files. Your client list is always shown as a chip under the lock keys in the panel, with Open Sheet ↗, so the Sheet is one click away when you need to add a client.
If the panel shows Connect Google account to load clients, click the button and sign in again. This happens if access was removed or expired.
Disconnect Google account in Settings removes the extension’s access and clears loaded data. You can also remove access any time at myaccount.google.com/permissions.
Step 5
Fill a login (daily use)
- Open the portal’s login page yourself. Some sites (IRCTC, for example) show the login form only after you click their Login button.
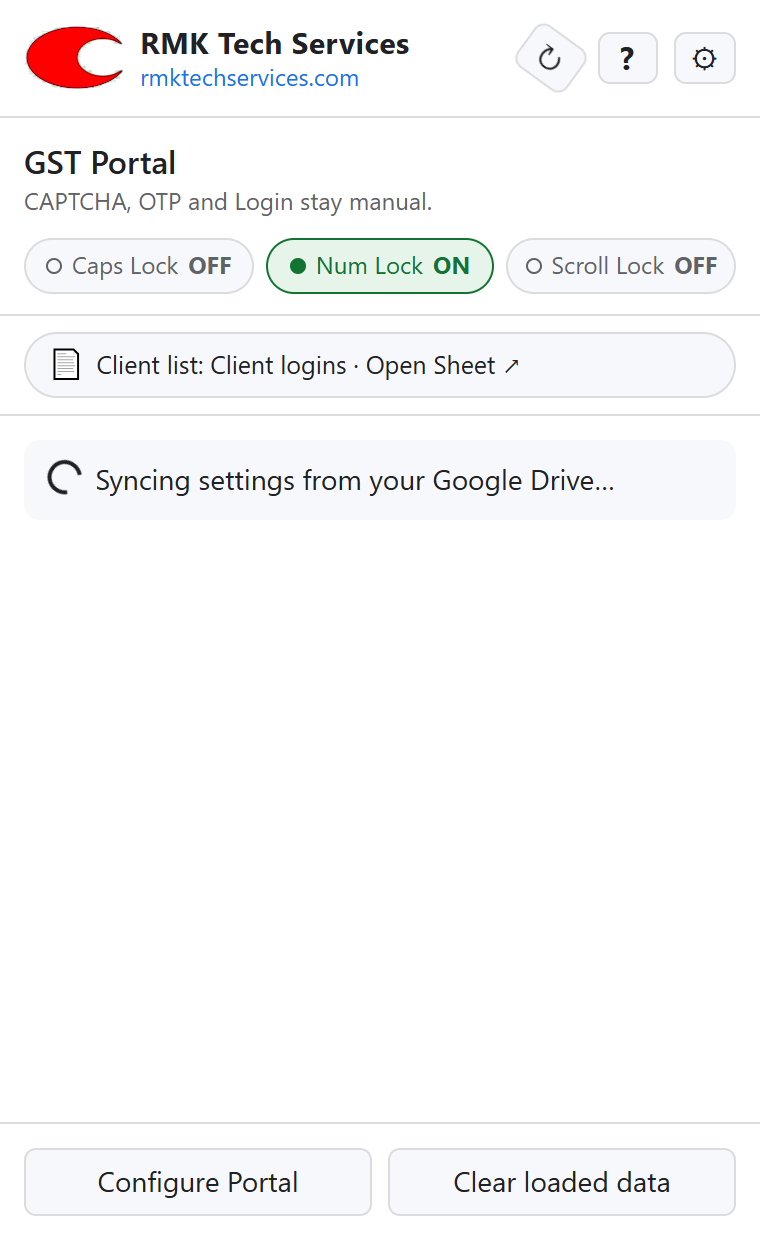
- Click the key icon. The panel shows the portal’s name and only its active clients (name and User ID; passwords are never shown).
- Click the client. The User ID and Password are filled into the page.
- Type the CAPTCHA, complete any OTP, and click the portal’s Login button yourself. The extension never does these for you.
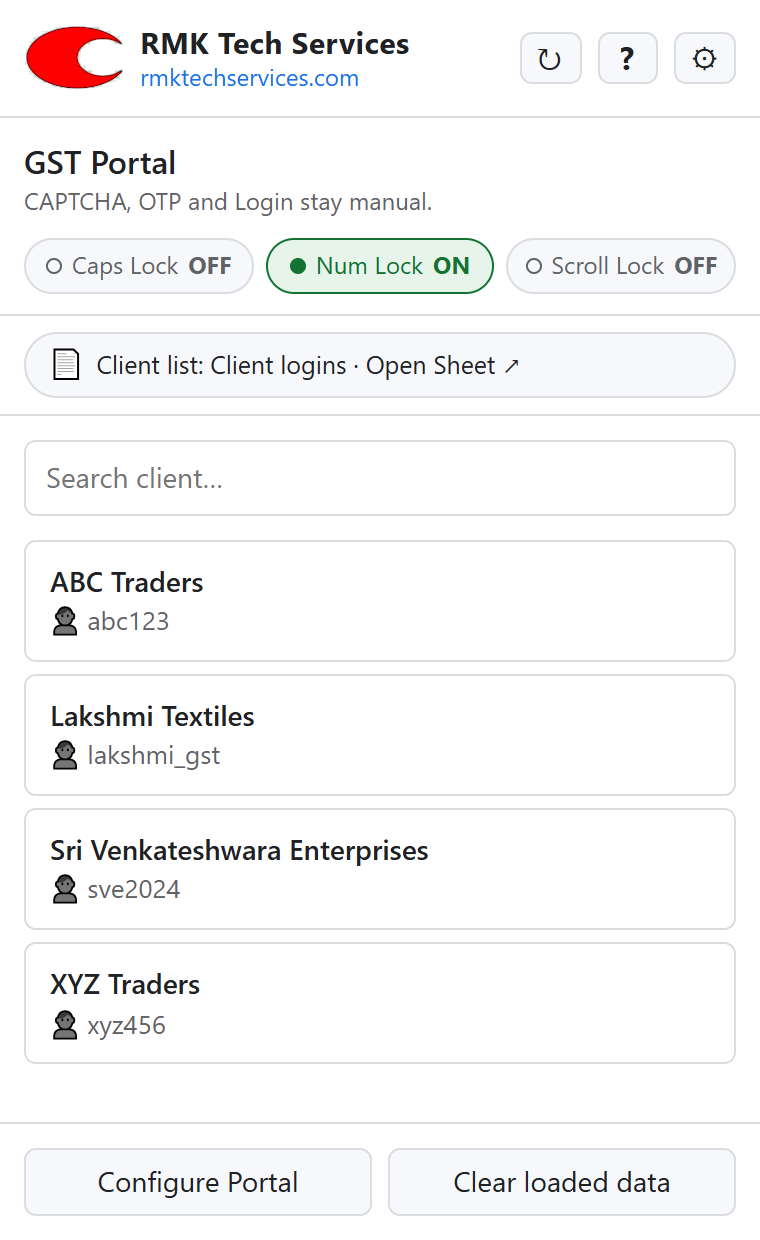
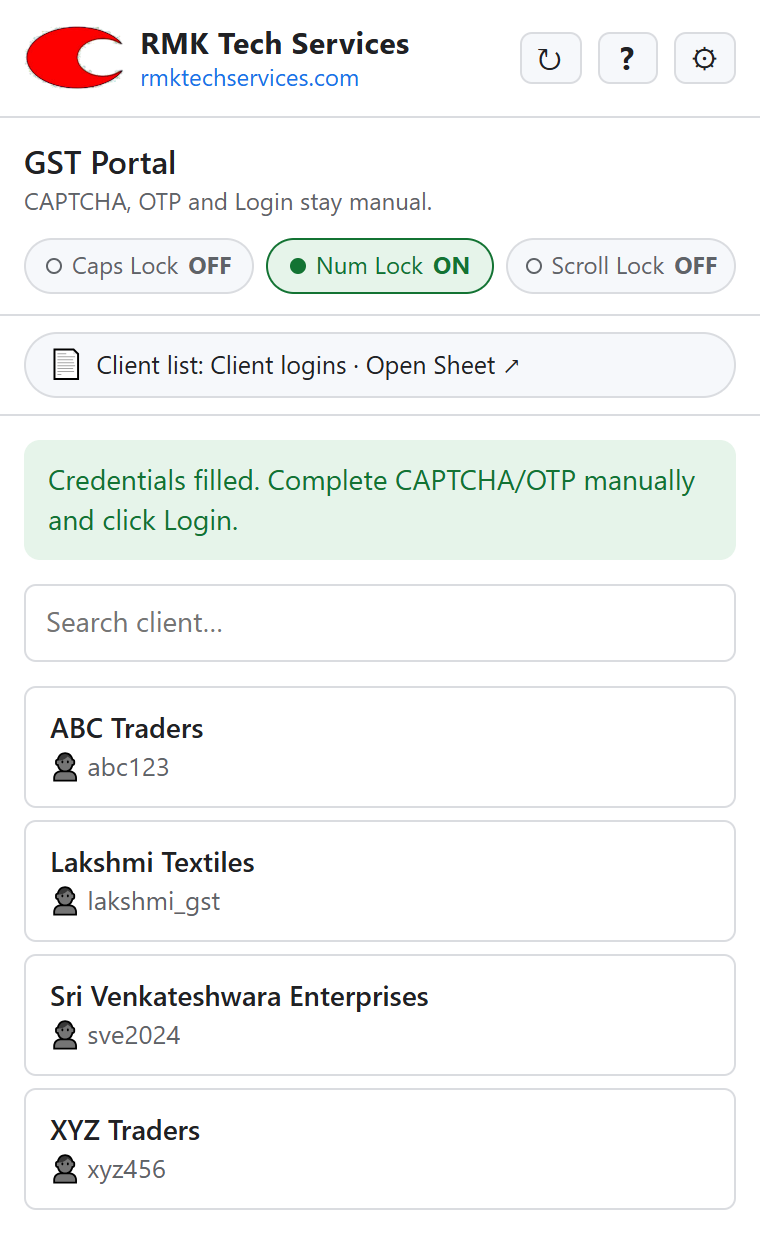
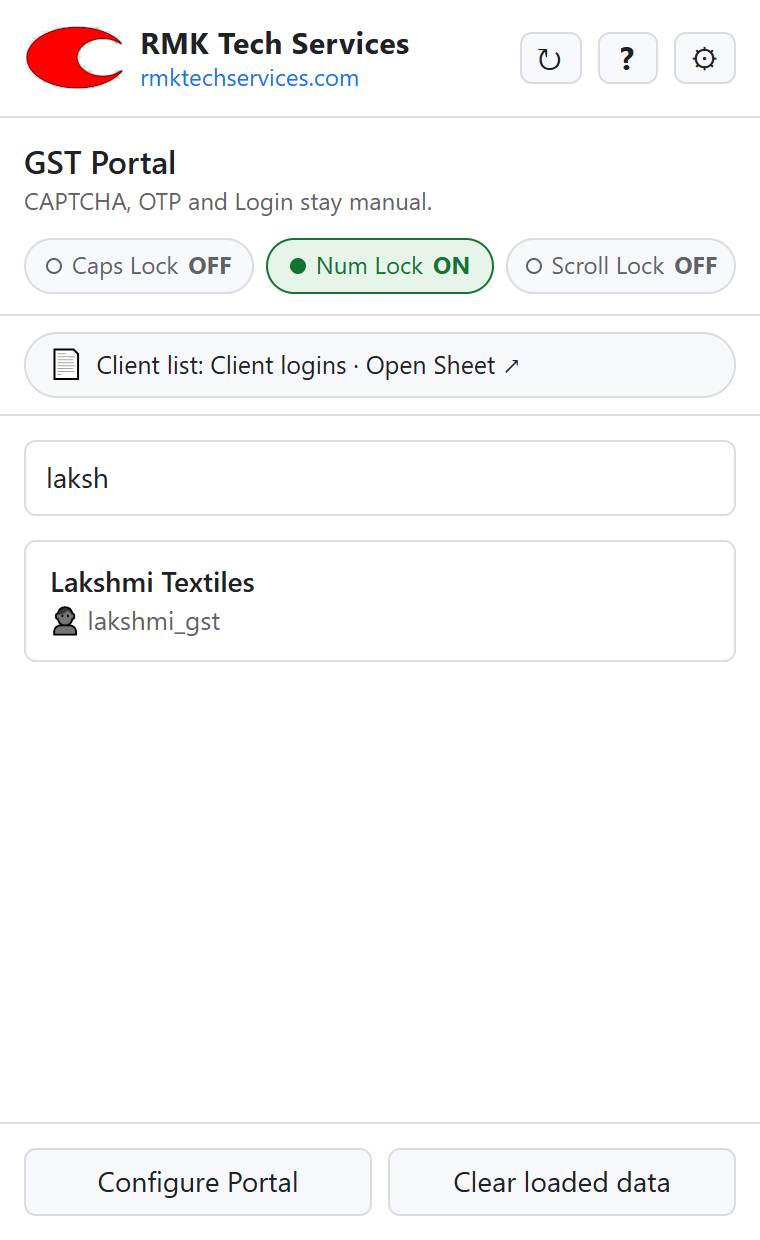
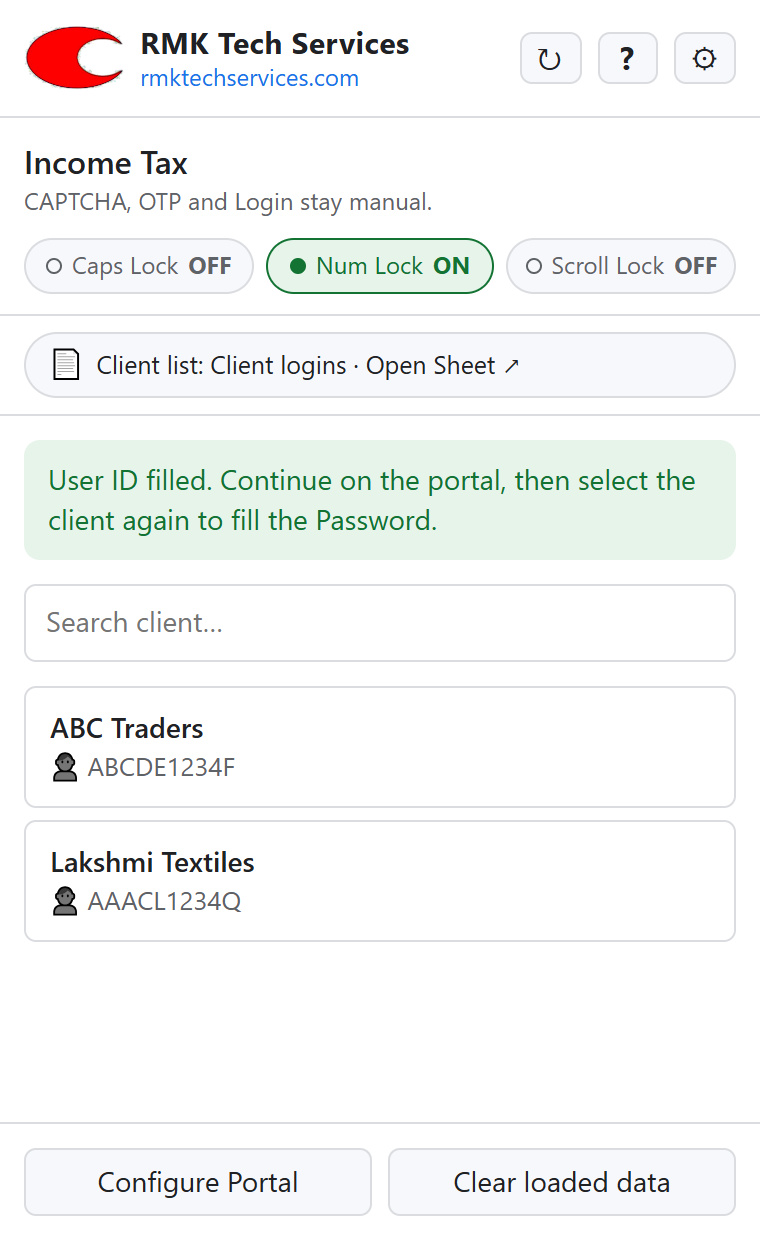
Lock-key indicators under the portal name show Caps Lock, Num Lock and Scroll Lock. Caps Lock turns amber when it’s on, because CAPTCHAs and passwords are case-sensitive.

- ↻ reloads the client list (after you edit the Sheet or file). It turns while the extension is loading or syncing; anything in progress shows a spinner.
- The client-list chip under the lock keys shows which list is in use and opens your Google Sheet.
- Clear loaded data removes the loaded list from memory immediately. It also clears automatically after 15 minutes and when Chrome closes.
Step 6
Configure a portal (when a field isn't filled)
Most portals are filled automatically. If a site changes its login page and the panel says a field could not be detected, show the extension where the boxes are. It takes a few seconds, is saved for next time, and reaches your other computers.
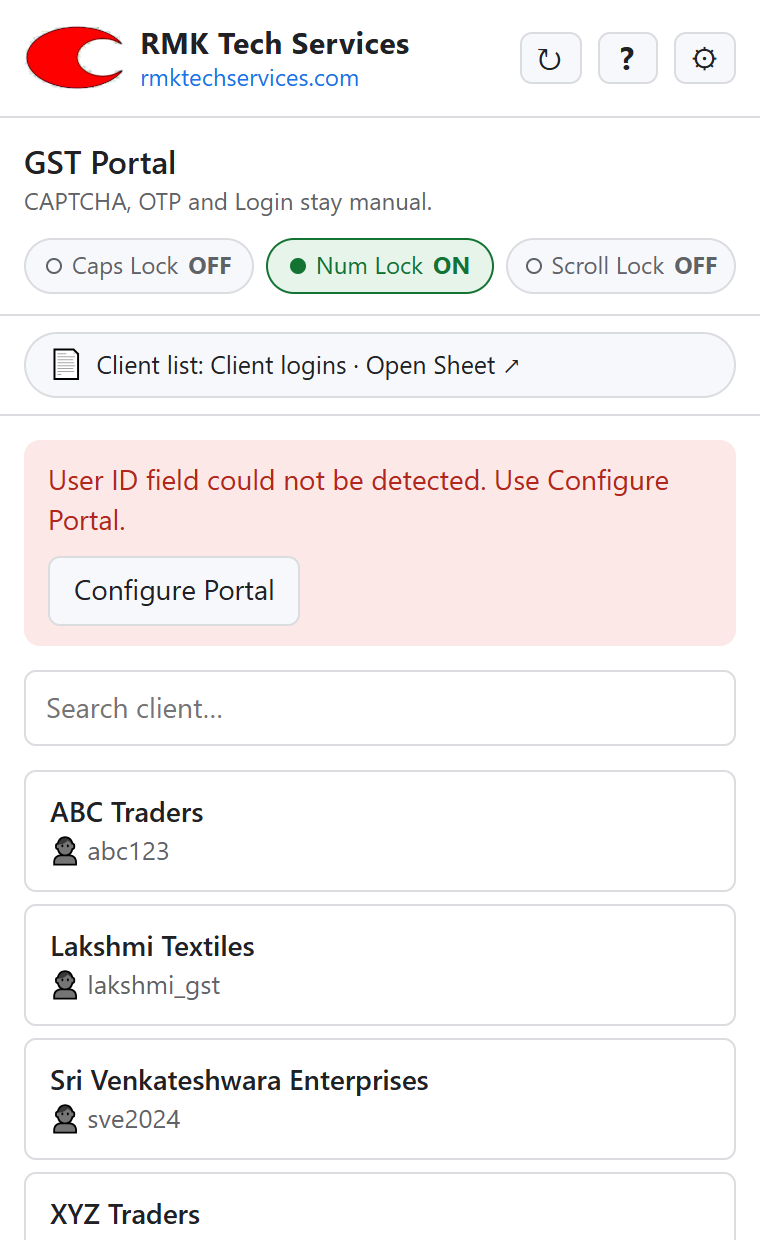
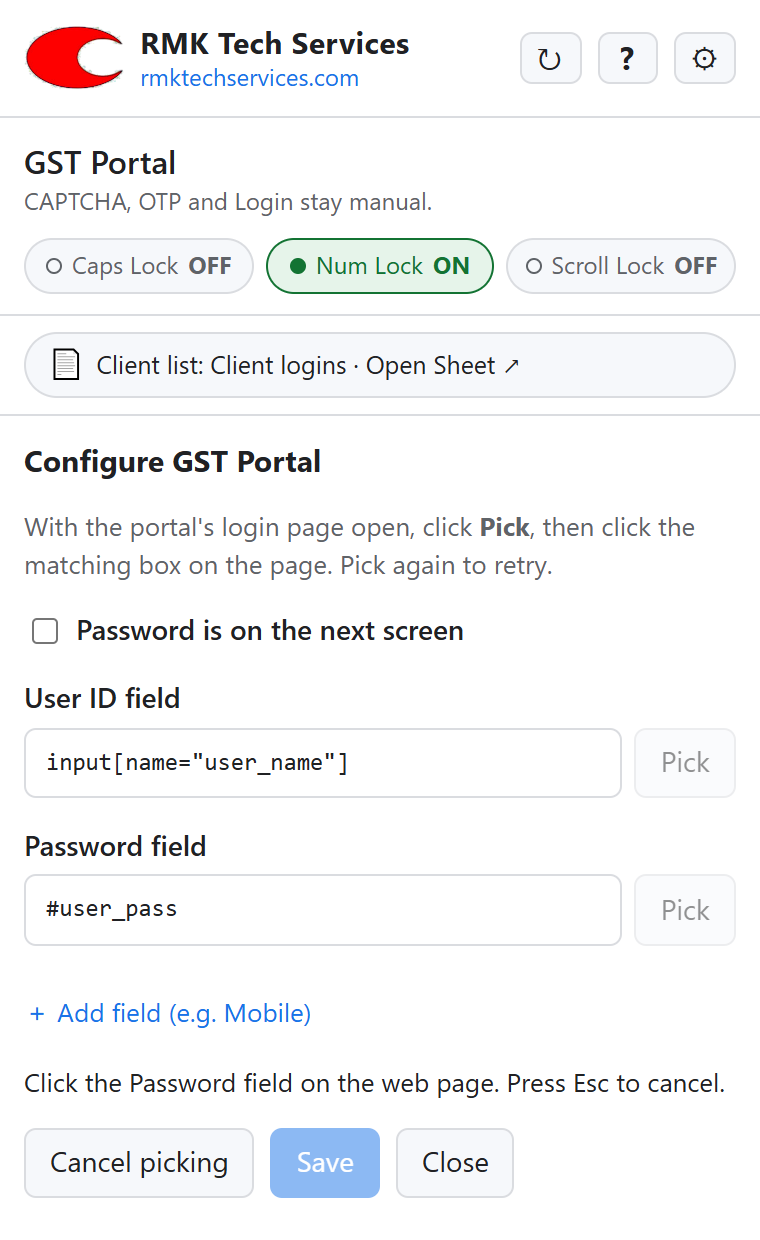
- Keep the portal’s login page open (with its login form showing) and click Configure Portal in the panel.
- Click Pick next to User ID field.
- On the web page, move the mouse over the User ID box (it’s highlighted in blue) and click it. CAPTCHA and OTP boxes are refused. Press Esc or Cancel picking to stop.
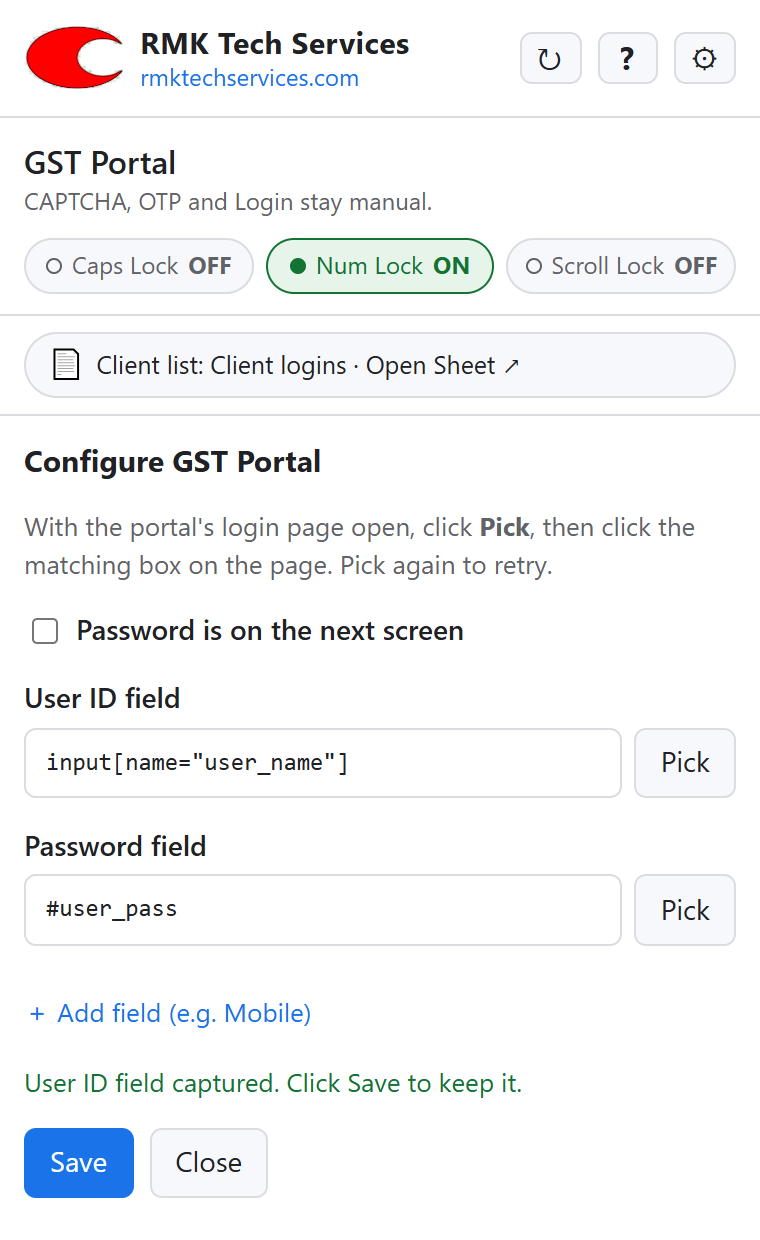
- Do the same for Password field, then click Save. Pick again any time to retry.
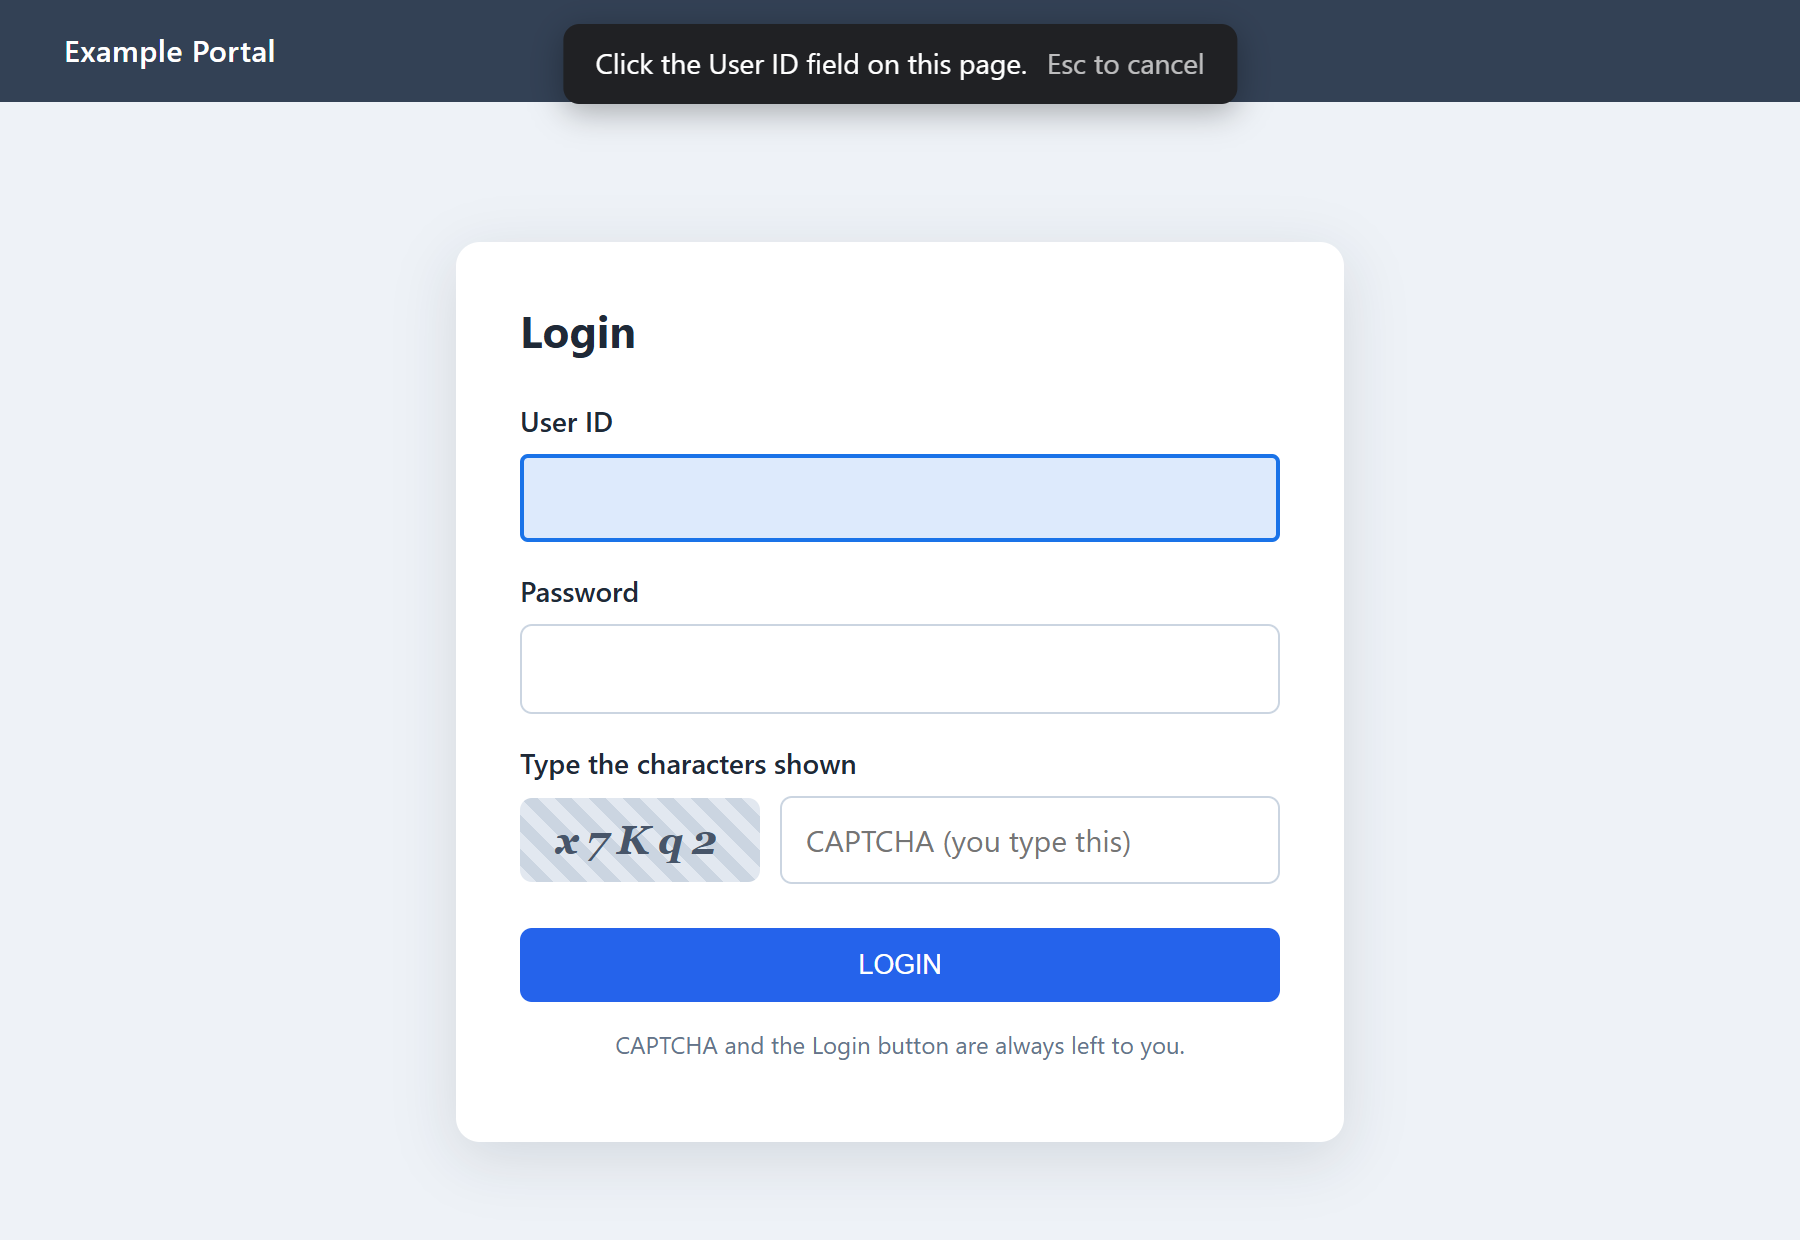
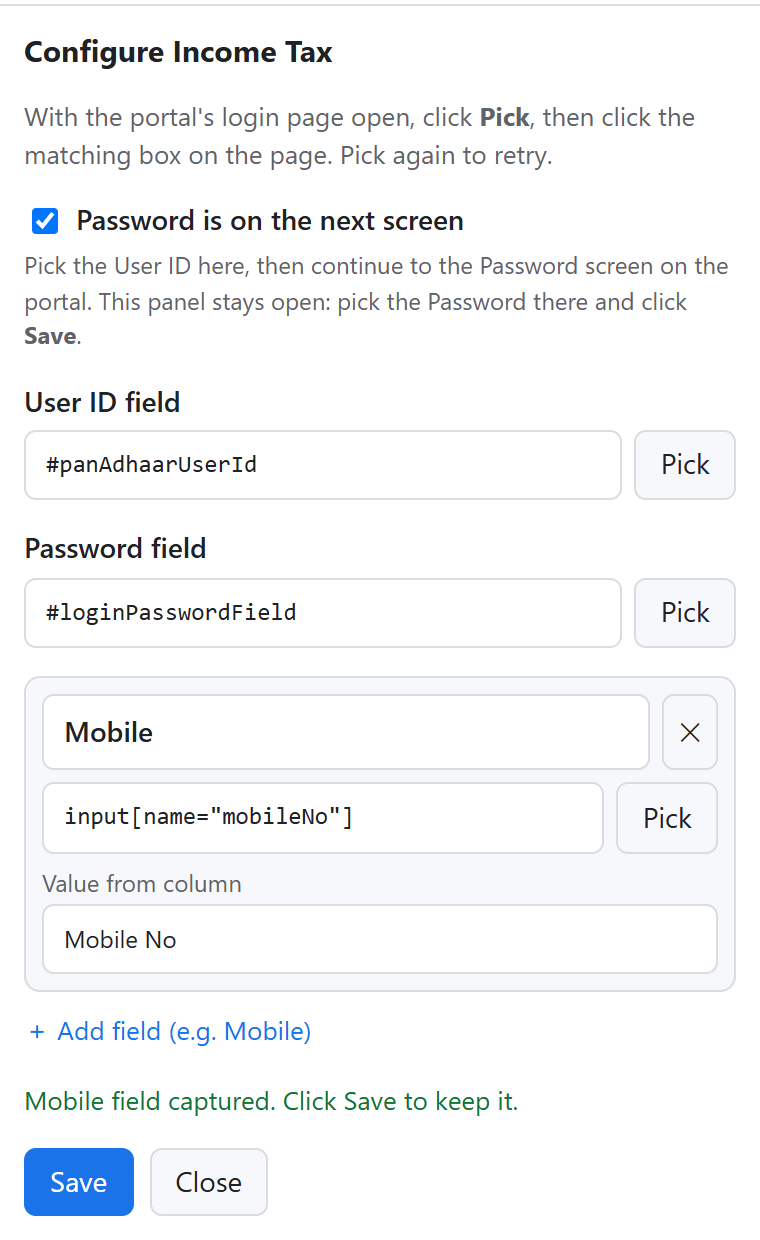
Password on the next screen? Some portals (Income Tax, HDFC, Passport Seva) ask for the User ID first and show the Password box only after you continue. Tick Password is on the next screen, pick the User ID, then continue to the Password screen on the portal. The panel stays open: pick the Password there and click Save. When you fill, click the client on each screen.
The portal asks for something else too, such as a mobile number or email?
- Add a column for it to your client list (for example Mobile) and fill it in for your clients. Click ↻ in the panel.
- In Configure Portal click + Add field, type its name (Mobile) and click Pick next to it, then click that box on the page.
- Under Value from column, choose the column the value comes from. Leave it empty when the column has the same name as the field. Click Save.
From then on, clicking a client fills that box as well, and the panel says Also filled: Mobile. A portal can have up to six extra fields; they can also be added in Settings → Portals. CAPTCHA and OTP boxes can never be used as extra fields.
Step 7
Ready-made and your own portals
Settings → Portals has a form at the top and a list of every portal below it. Use the search box to find one among the 41.
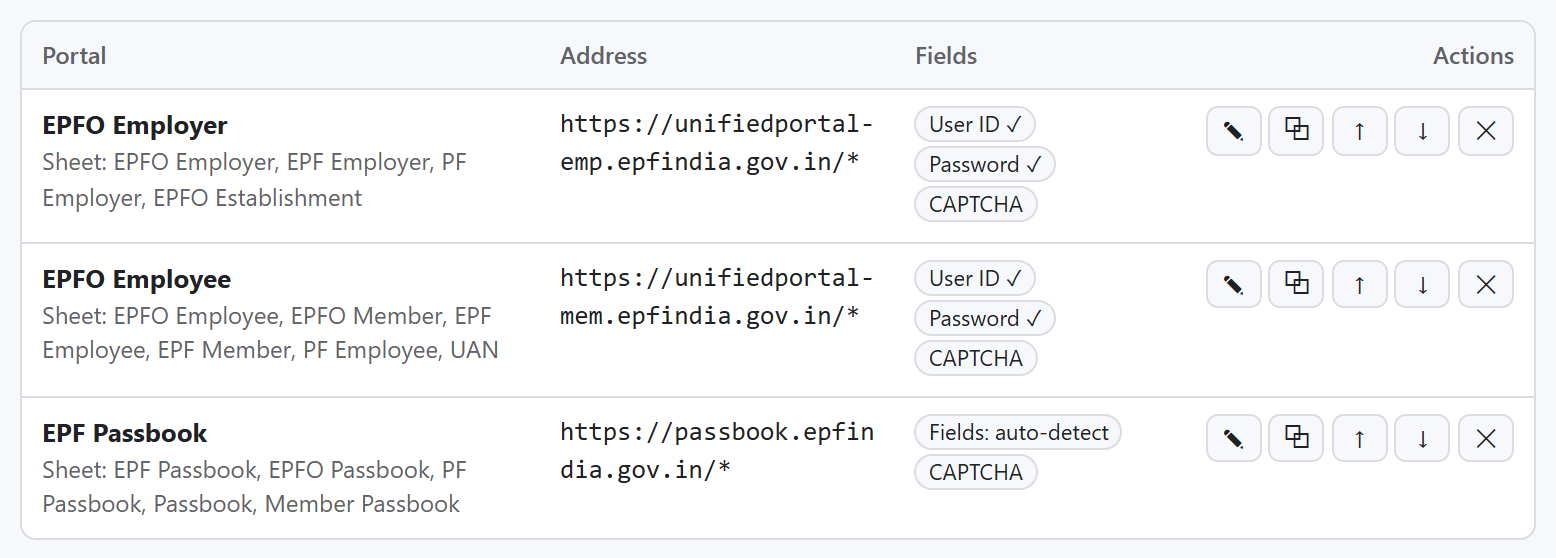
- ✎ Edit loads the portal into the form; change it and click Update portal. ⧉ Duplicate starts a new portal from a copy. ↑ ↓ set the order (only matters when two portals match a page equally well). ✕ Delete removes it.
- Fields: auto-detect means the extension finds the boxes by itself. User ID ✓ / Password ✓ mean exact fields are set (by us or by Configure Portal).
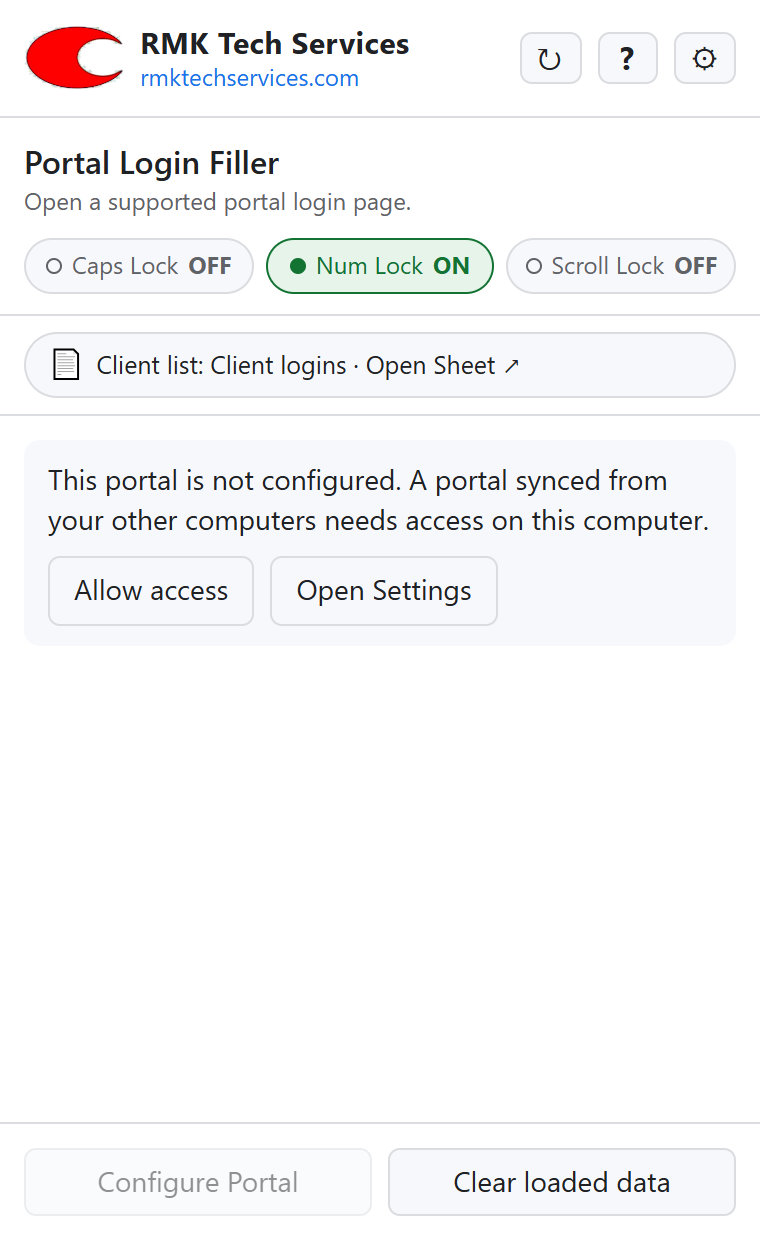
- needs access here: this computer hasn’t allowed the extension on that website yet. Click Allow website access below the list (or Allow access in the panel) once.
- Ready-made portals get updates. When we improve a portal (a new address, better fields), the update arrives with the extension and keeps anything you changed yourself. The tag shows what you changed; ↺ restores our version. Settings tells you once what was added or updated.
Add your own portal
- Open the website’s login page and copy the address from Chrome’s address bar.
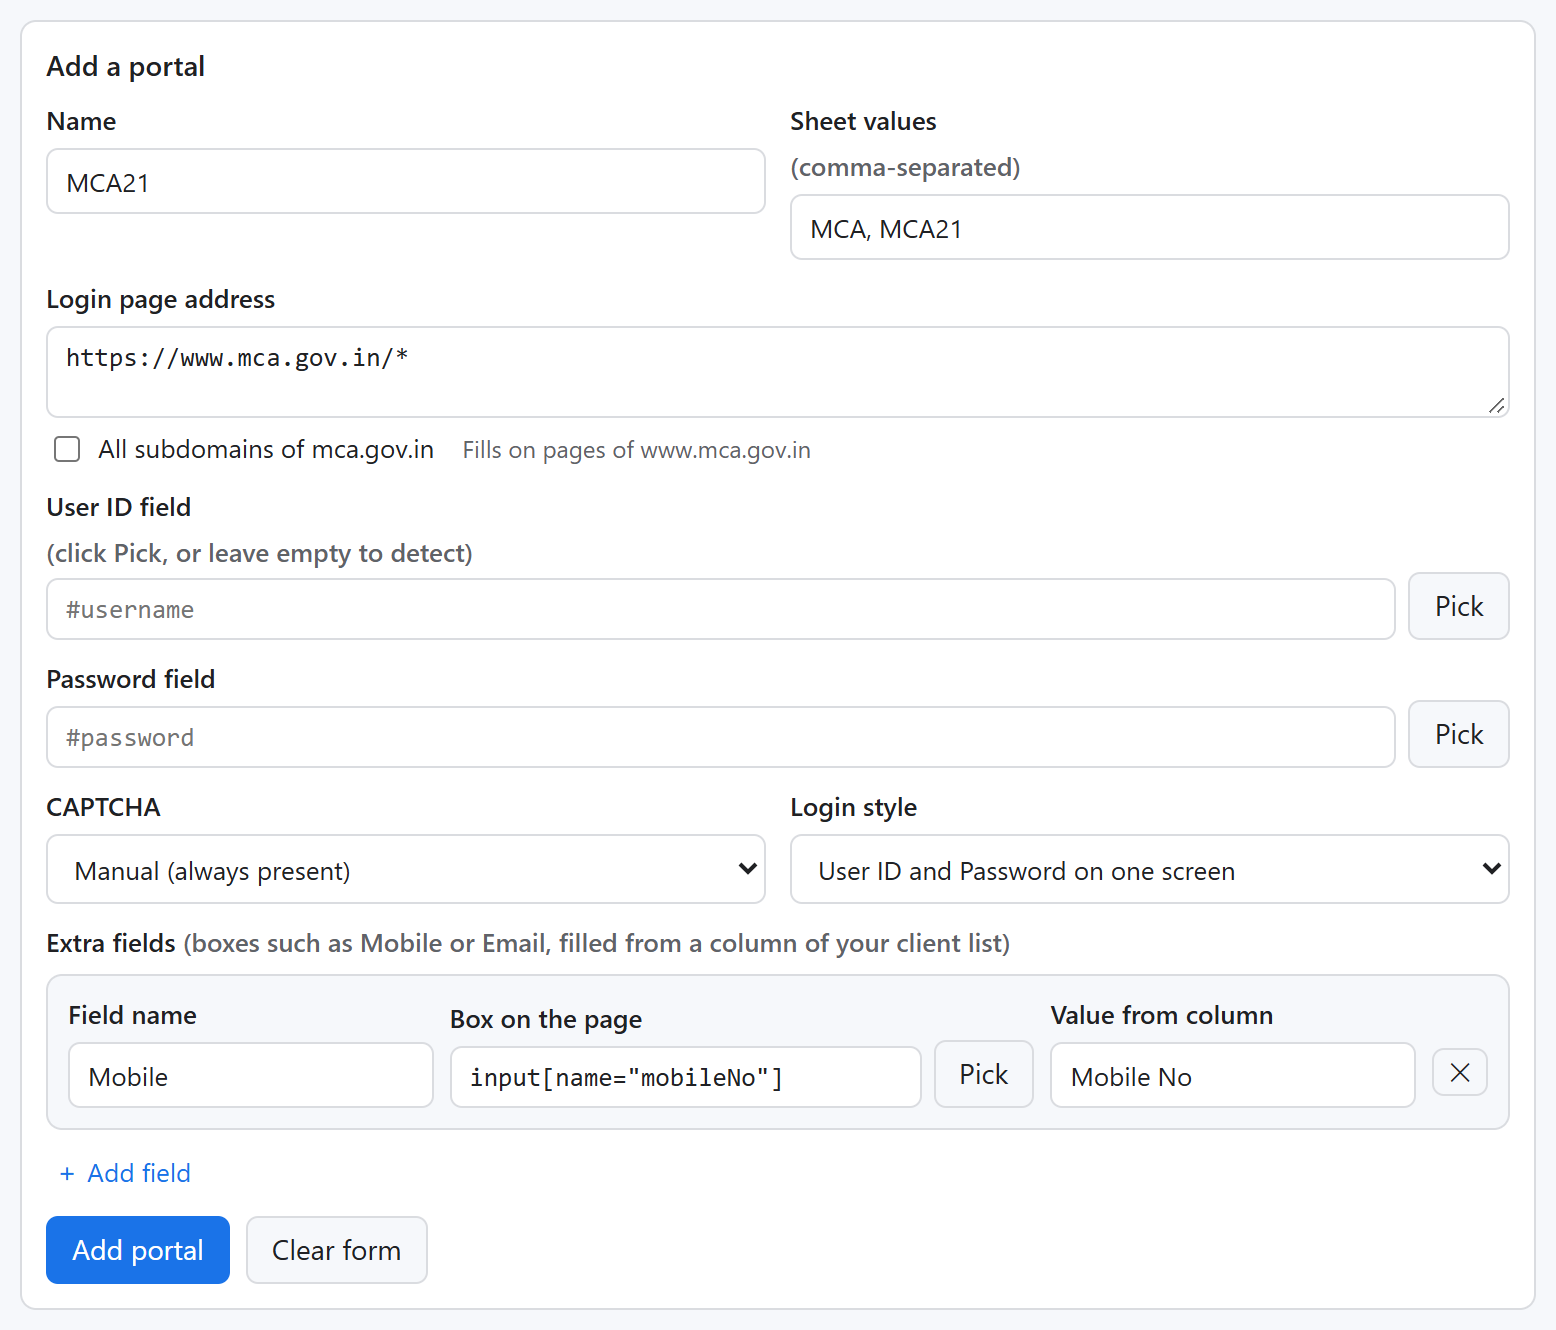
- In Settings → Portals, type a Name and paste the address into Login page address. It becomes a pattern automatically (for example
https://www.mca.gov.in/*). Tick All subdomains if the login moves between sub-sites. - Optionally add Sheet values: other names you use for it in the Portal column.
- Optional: with the login page still open in its tab, click Pick next to User ID field. The login page comes to the front: click its User ID box and you are brought back to Settings. Do the same for Password field.
- Does the page also ask for a mobile number or email? Click + Add field and fill in the three boxes: Field name (Mobile), Box on the page (click Pick and then the box on the login page) and Value from column (the column of your client list with the value; leave it empty when it has the same name).
- Click Add portal and Allow Chrome’s prompt for that website.
- Open its login page and click a client. If a field isn’t found, use Configure Portal (Step 6).
Chrome lets the extension work on GST, Income Tax and EPFO straight after install. For the other ready-made portals and your own, it asks once per computer. When the panel shows Allow access, click it and approve Chrome’s prompt.
Step 8
Working on several computers
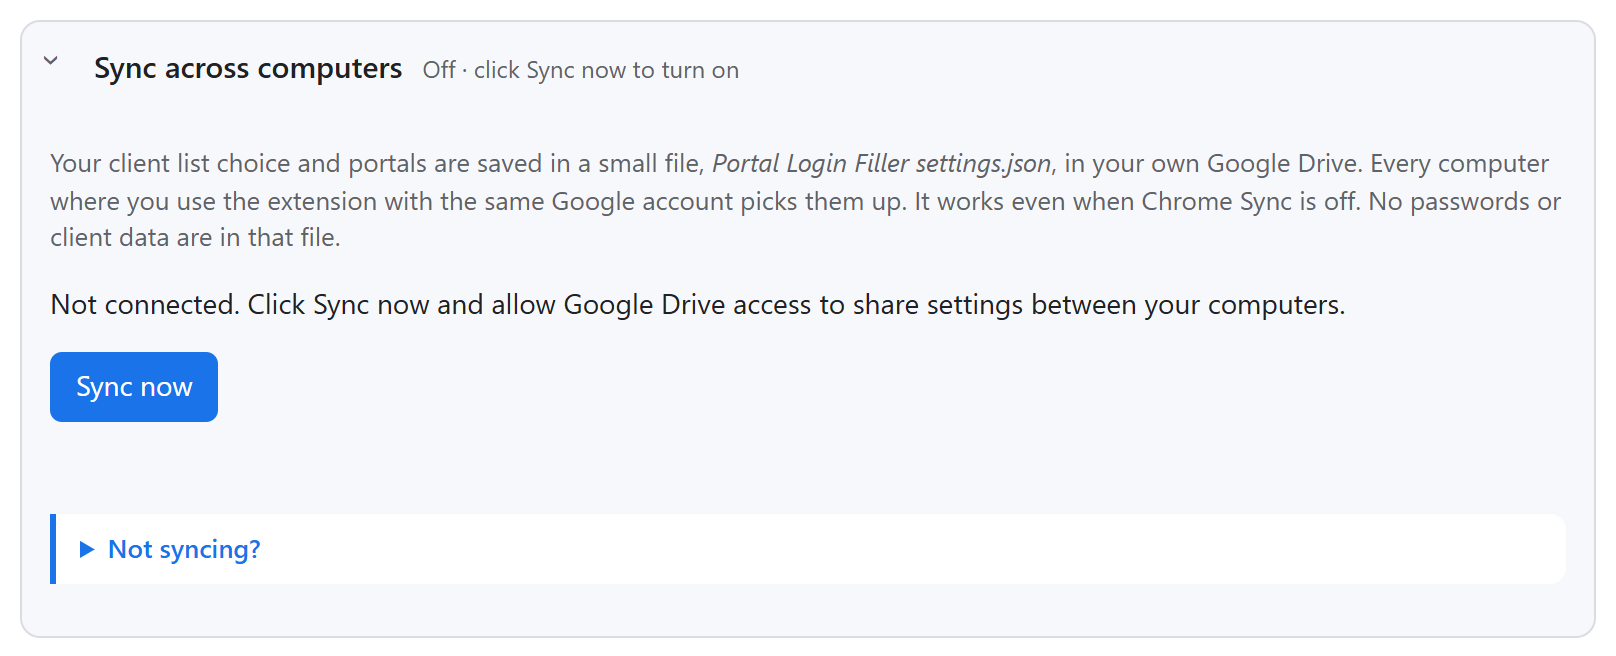
Install the extension on each computer and sign in with the same Google account. Your settings travel through a small file, Portal Login Filler settings.json, in your own Google Drive. Chrome Sync is not needed.
| Follows you to every computer | Set up on each computer |
|---|---|
|
|
- On the computer that is already set up, open Settings → Sync across computers and click Sync now (allow Google Drive access the first time).
- On the other computer, click Sync now in the same place, or in the panel’s “no clients” message. The client list and portals appear.
- After that it is automatic: each computer checks for changes when the panel or Settings opens.
Step 9
Lock it with a PIN
Leaving your PC unattended? With the PIN lock on, nobody can see your clients or fill a login without your PIN.
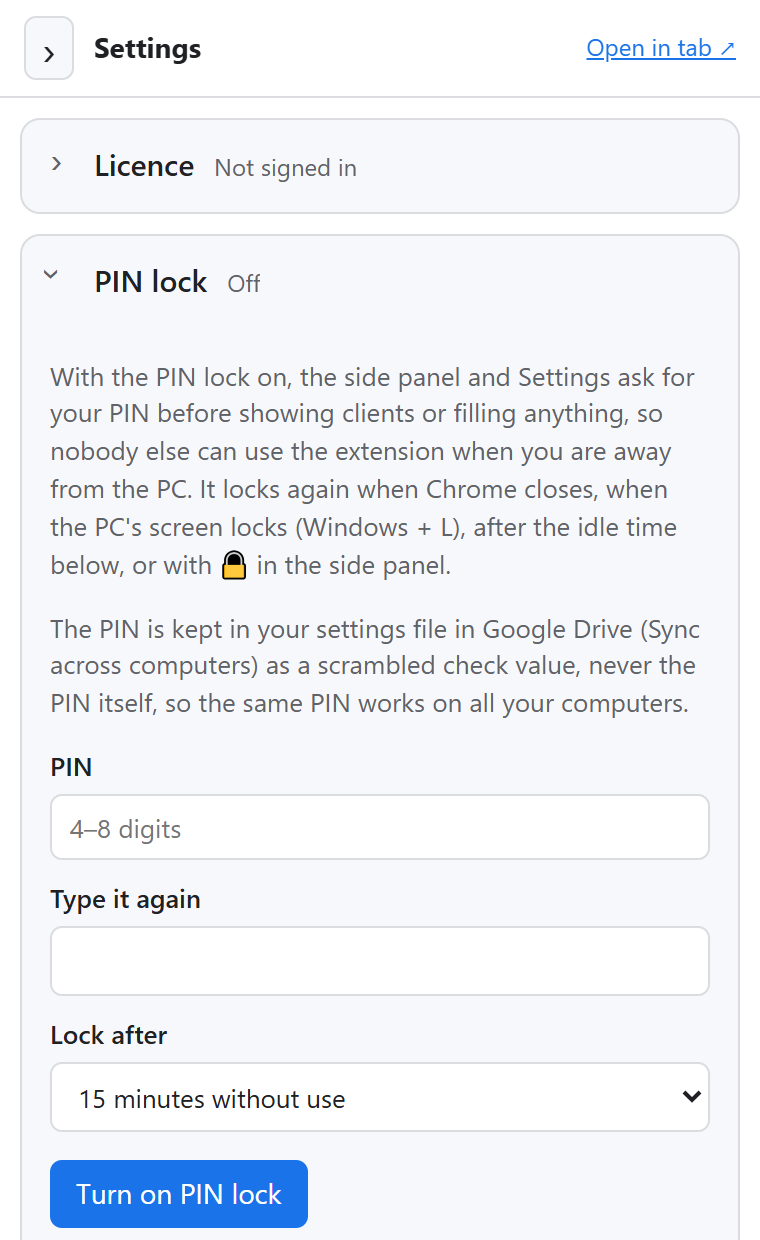
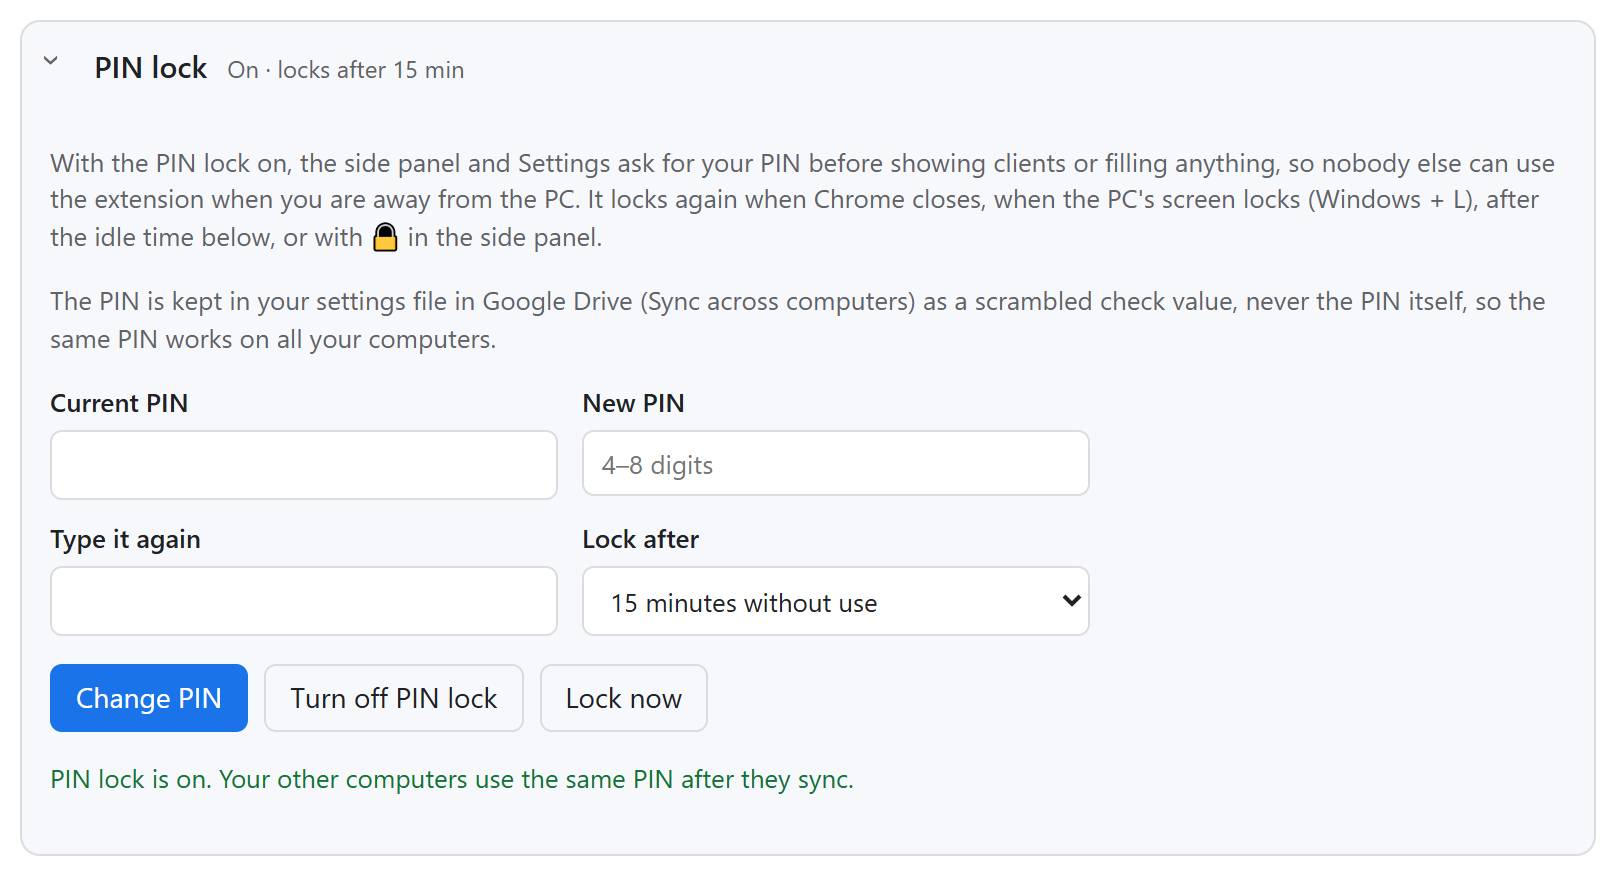
- Open Settings → PIN lock, type a PIN of 4 to 8 digits twice, and choose when it should lock by itself: after 5, 15, 30 or 60 minutes without use, or only when the screen locks.
- Click Turn on PIN lock. This computer stays unlocked for now.
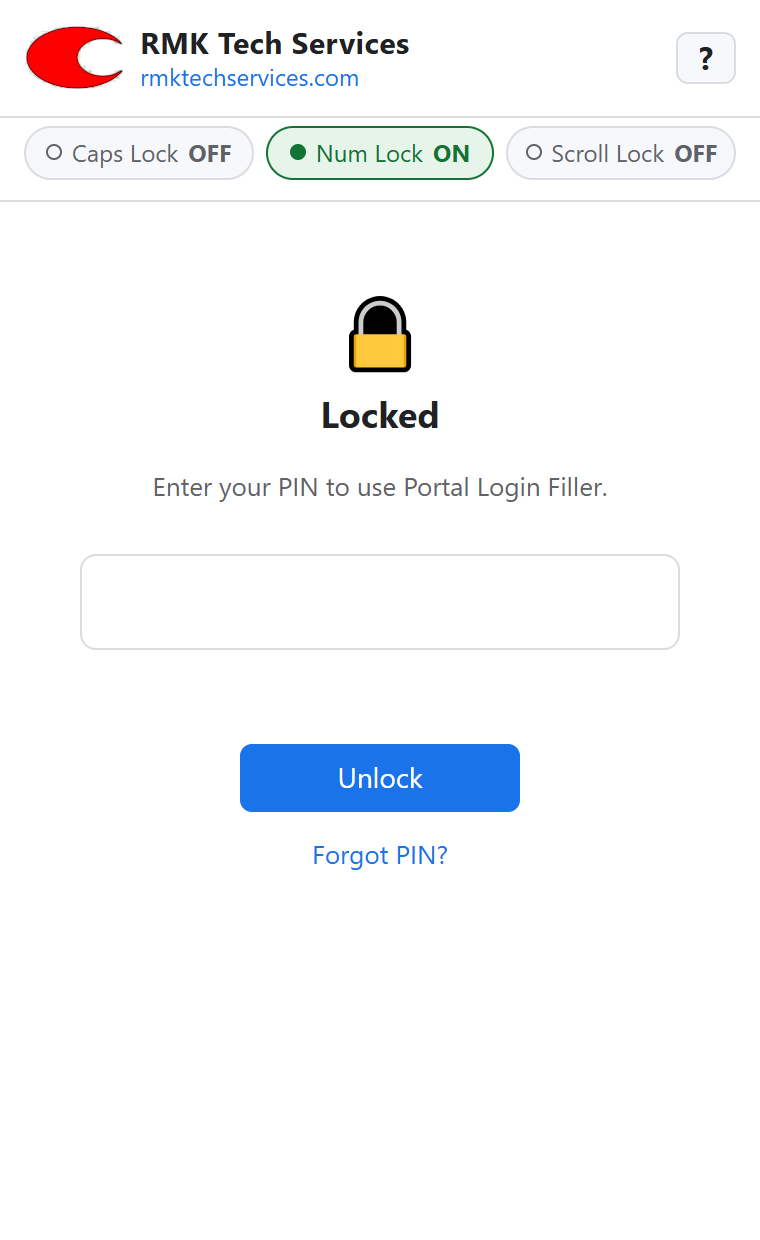
- From then on the extension locks when Chrome closes, when you lock your PC (Windows + L), after the time you chose, or when you click 🔒 at the top of the panel. Type your PIN and click Unlock. The Caps Lock and Num Lock indicators stay on the lock screen, so you can see that Num Lock is on before typing the PIN on the number pad.
Step 10
Messages and troubleshooting
| Message | Why | What to do |
|---|---|---|
| This portal is not configured. | The open tab isn't one of your portals. | Open the portal's login page. For another website, click Add a portal (Step 7). Added it on another computer? Click Sync now. |
| … portals … need one-time website access on this computer. | Chrome asks for access to each portal's website once per computer. | Click Allow access and approve Chrome's prompt. |
| Choose your client list … in Settings / No client list yet | No client list has been set up on this computer yet. | Click the chip or Open Settings → Client list: create a sample, or choose your Google Sheet or Excel file. Set up elsewhere? Click Sync now. |
| No active clients for this portal. … use Portal wording the extension doesn't know yet. | Your Portal column uses your own names. | Click Match Portal wording and match each name to a portal once. |
| No active clients configured for this portal. | No rows for this portal, or all marked inactive. | Check the Active column (Yes shows a row), then click Retry. |
| Allow access to your Excel client file … | Chrome was restarted and needs your OK to read the file again. | Click Load clients from file and allow. |
| The Excel client file was not found … | The file was moved, renamed or deleted. | Settings → Choose .xlsx file… and pick it again. |
| The Excel file is password-protected or in the old .xls format … | The workbook has an open password, or is an .xls file. | In Excel: File → Info → Protect Workbook → remove the password, then Save As .xlsx. |
| Connect Google account to load clients. | Not signed in to Google, or access expired or was revoked. | Click Connect Google account and allow. |
| Unable to open your Google Sheet … | The Sheet wasn't picked or created with this Google account (for example, after switching accounts). | Settings → Choose Google Sheet… and pick it again. |
| Unable to load client records. Check Google Sheet access. | Google Sheets couldn't be reached. | Check your internet connection and click Retry. |
| … missing these columns: … | The header row doesn't have the required column names. | Row 1 must contain Portal, Client, User ID, Password (and optionally Active). |
| User ID / Password field could not be detected. Use Configure Portal. | The portal's login page has changed, or its login form isn't open yet. | Open the login form on the page (some sites show it after you click Login), then click the client again. Still failing? Configure Portal (Step 6). |
| The page did not accept the value … | The selected box isn't the real input. | Use Configure Portal and pick the fields again. |
| The active tab changed. Select the client again. | You switched tabs while choosing. | Go back to the portal tab and click the client again. |
| Google sign-in was not completed, so settings could not be synced. | The Google window for Drive access was closed. | Click Sync now again and allow access. |
| Google Drive did not respond as expected … | Google Drive was briefly unavailable. | Wait a moment and click Sync now. Your settings stay on this computer meanwhile. |
| Locked · Enter your PIN … | The PIN lock is on and Chrome was restarted, the screen was locked, the PC was idle, or 🔒 was clicked. | Type your PIN and click Unlock (Step 9). |
| Wrong PIN. Too many tries: wait … | More than 5 wrong PINs in a row. | Wait the time shown, then type the right PIN. Forgot it? Click Forgot PIN? |
| Mobile: box not found on this page. Use Configure Portal. | An extra field's box isn't on this page (or the page changed). | Configure Portal → Pick the box again for that field, then Save. |
| Mobile: empty in your client list for this client. | That client's cell in the field's column is empty. | Fill the cell in your Sheet or Excel file, then click ↻. |
Still stuck? Email hello@in.rmktechservices.com or call +91 7813 99 88 33. Never send us passwords: describe the portal and the message instead.